Splash-Screen 设置启动屏
本文档主要讲述Android与IOS端启动图设置
首先,配置启动图的方式有很多种。本文档只是针对常见启动图方案进行一种说明。如果你发现以下的实现无法满足。请积极寻找原生开发组同学协助.
目前本方案存在的限制有
- 图标必须是全屏图片。不支持仅提供部分图片设置的方案
- 最好是纯色背景。这样设置背景色比较容易
配置Android
安卓端设置启动图一般有三种方式
不建议使用使用react-native-splash-screen, 此库已经于2021年11月停止维护建议使用使用expo-splash-screen自己编写原生代码实现。 实现类型expo-splash-screen. 会Android开发的同学可以自己实现。能提供更多的自定义UI
使用react-native-splash-screen
你可以按照此文档内容一步步进行设置即可。下面会重点讲述一下相关内容。如果设置后无法生效,请参考原文档一步一步执行一次
PS 修改之后 需要手动执行 yarn android 重新安装一下包
需要修改的文件

新建splashscreen_image.png
图片命名必须叫这个!!!
其次。需要在不同分辨率目录下新增同名不同分辨率的启动图。
这个图片你可以从蓝湖直接下载。或者找UI要。
图片分辨率规则为:
- mdpi: 320x628,
- hdpi: 480x942,
- xhdpi: 640x1256,
- xxhdpi: 960x1884,
- xxxhdpi: 1280x2512
否则会出现旧机型Crash问题
新建splashscreen.xml
<layer-list xmlns:android="http://schemas.android.com/apk/res/android">
  <item android:drawable="@color/splashscreen_background"/>
</layer-list>修改 values/colors.xml
<resources>
+  <color name="splashscreen_background">#FCFBFA</color>  <!-- #AARRGGBB or #RRGGBB format -->
+  <color name="splashscreen_statusbar_color">#00000000</color>  <!-- #AARRGGBB or #RRGGBB format -->
  <!-- Other colors defined for your application -->
</resources>splashscreen_background: 背景颜色 splashscreen_statusbar_color: 状态栏颜色。设置为透明
修改 values/strings.xml
<resources>
  <string name="app_name">app_name</string>
+ <string name="expo_splash_screen_status_bar_translucent">true</string>
</resources>expo_splash_screen_status_bar_translucent: 设置为true,表示启动屏透过状态栏
修改 styles.xml
<resources>
  <!-- Base application theme. -->
  <style name="AppTheme" parent="Theme.AppCompat.Light.NoActionBar">
+    <item name="android:windowBackground">@drawable/splashscreen</item>
+    <!-- this line instructs the system to use 'splashscreen.xml' as a background of the whole application -->
+    <item name="android:statusBarColor">@color/splashscreen_statusbar_color</item>
    <!-- Customize your theme here. -->
    <item name="android:editTextBackground">@drawable/rn_edit_text_material</item>
  </style>

</resources>修改 AndroidManifest.xml
调整MainActivity,包含android:theme 属性
<manifest xmlns:android="http://schemas.android.com/apk/res/android"
    package="com.example.myapp">

  ...

  <application ...>

+   <!-- Ensure that 'android:theme' property is pointing to the style containing native splash screen reference - see 'styles.xml' -->
    <activity
      android:name=".MainActivity"
+     android:theme="@style/AppTheme"
      ...
    >
      ...
    </activity>
  </application>

</manifest>配置IOS
IOS端设置启动图就比较简单了. 目前苹果官方要求使用stroybook进行设置启动屏。所以我们这里也使用stroybook进行设置
打开XCode 并创建图片
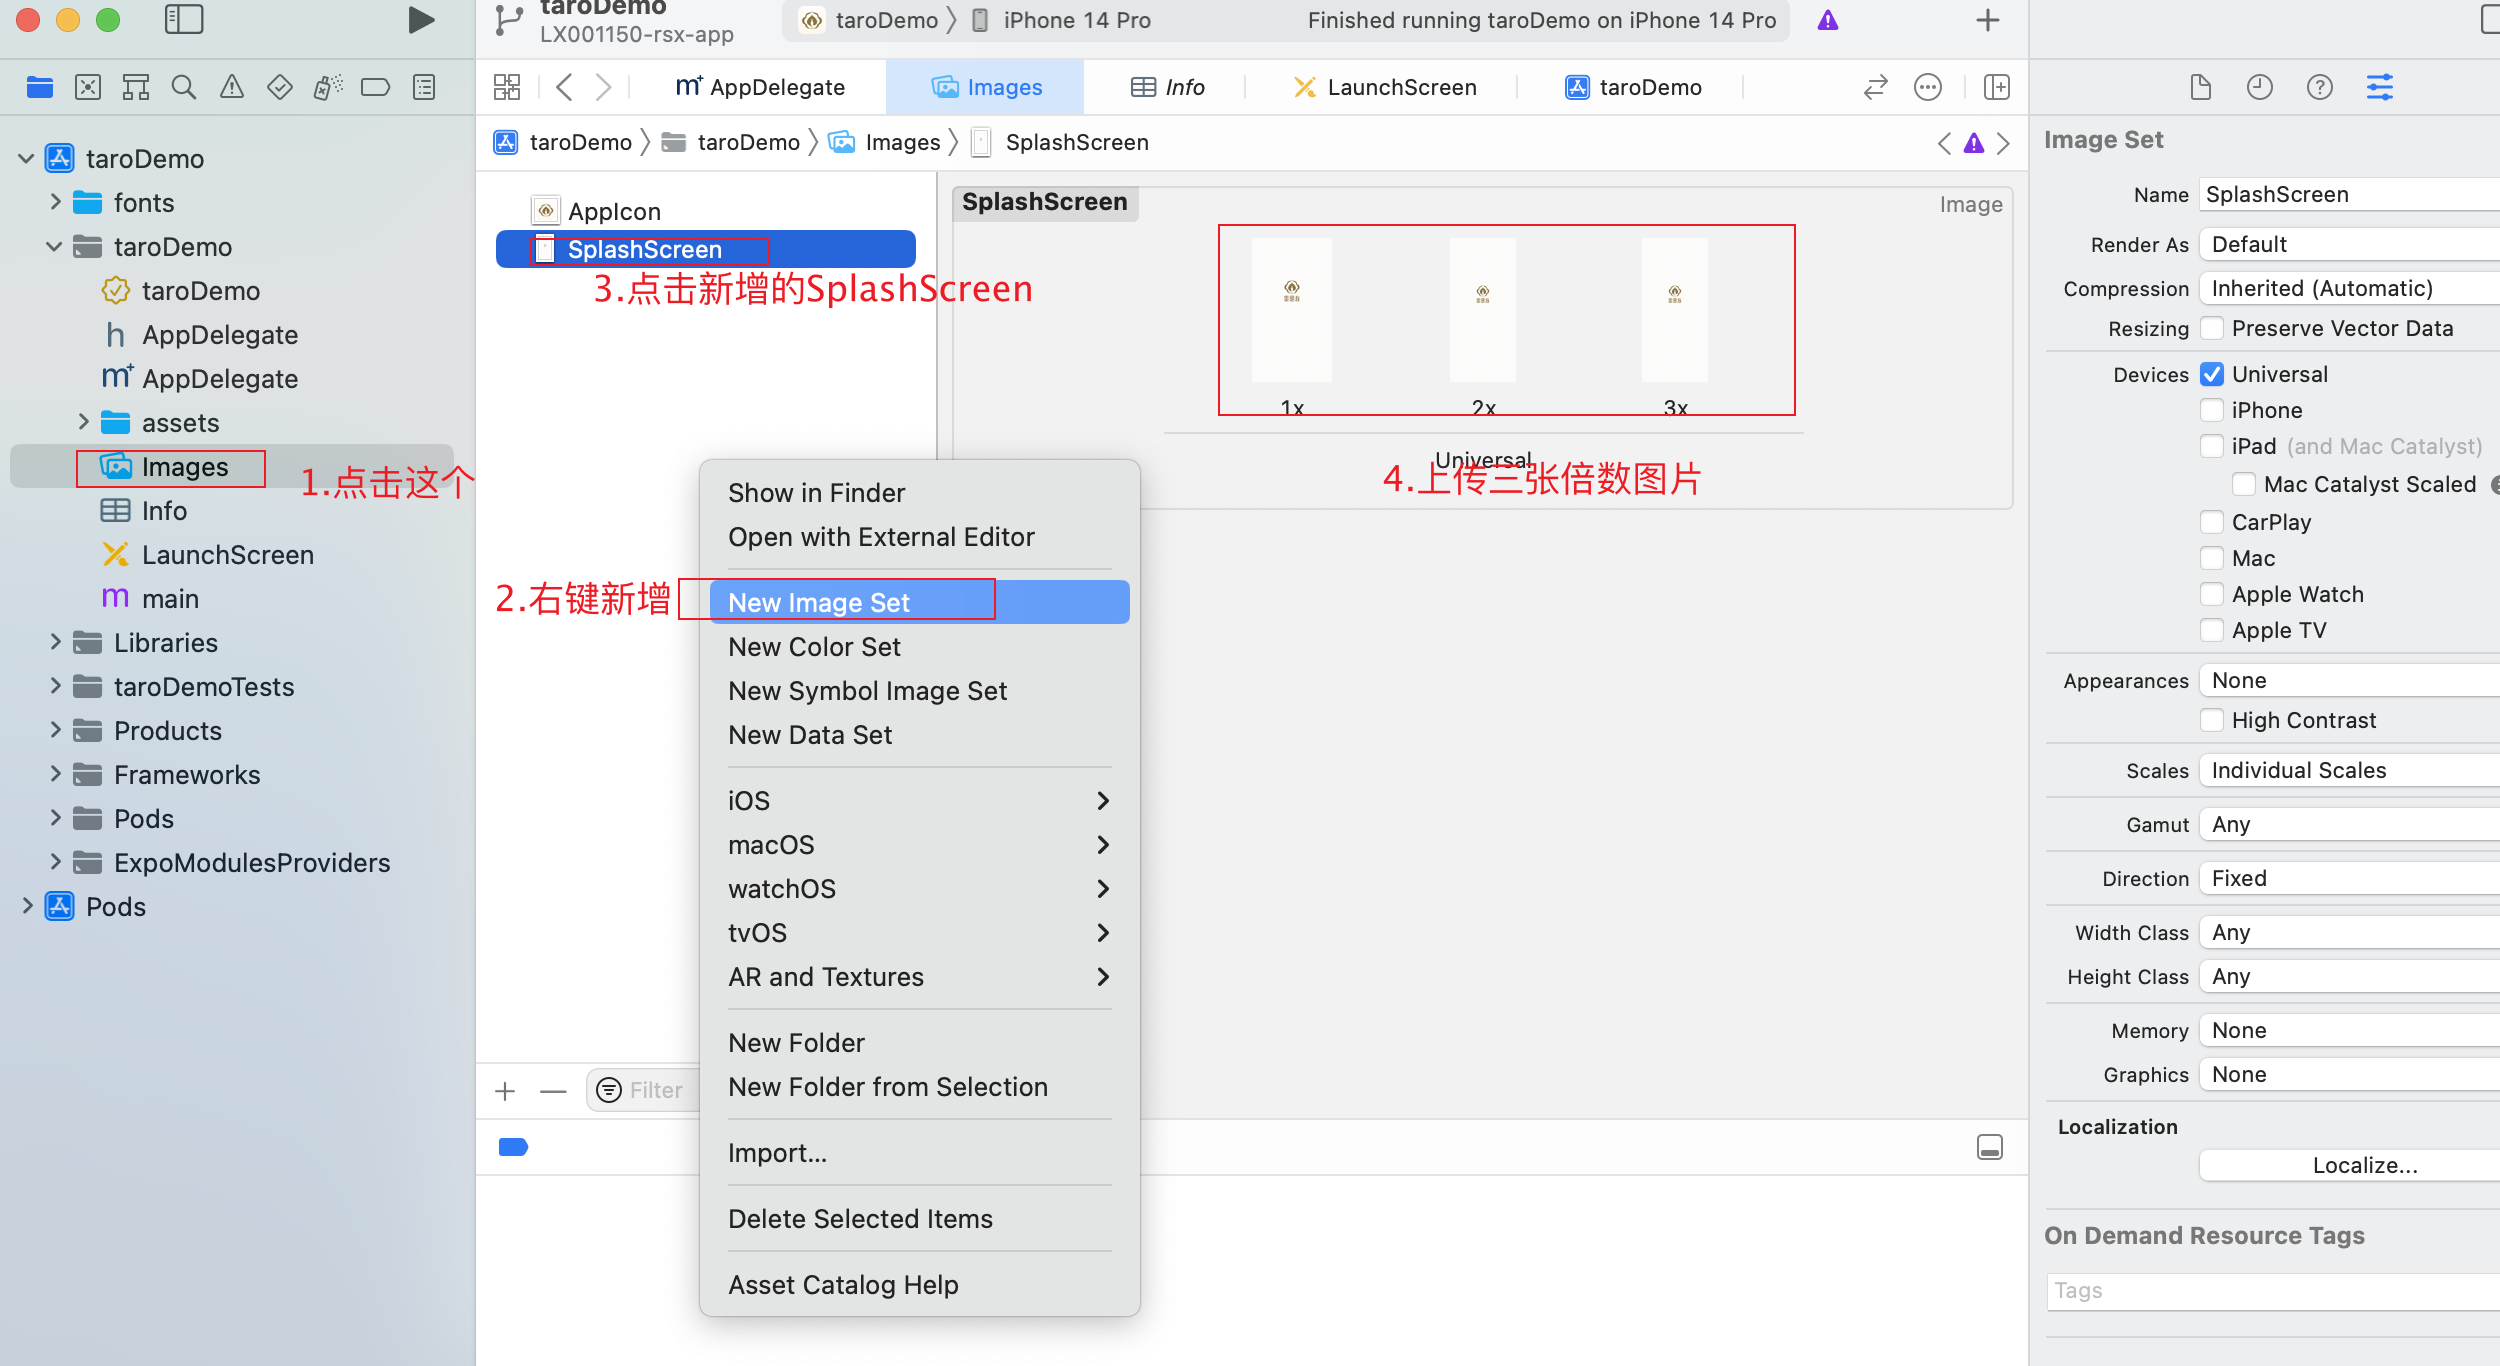
主要步骤 1.找到Images.xcassets文件夹 2.新建一个Image Set 3.将图片拖入到Image Set中
设置启动图
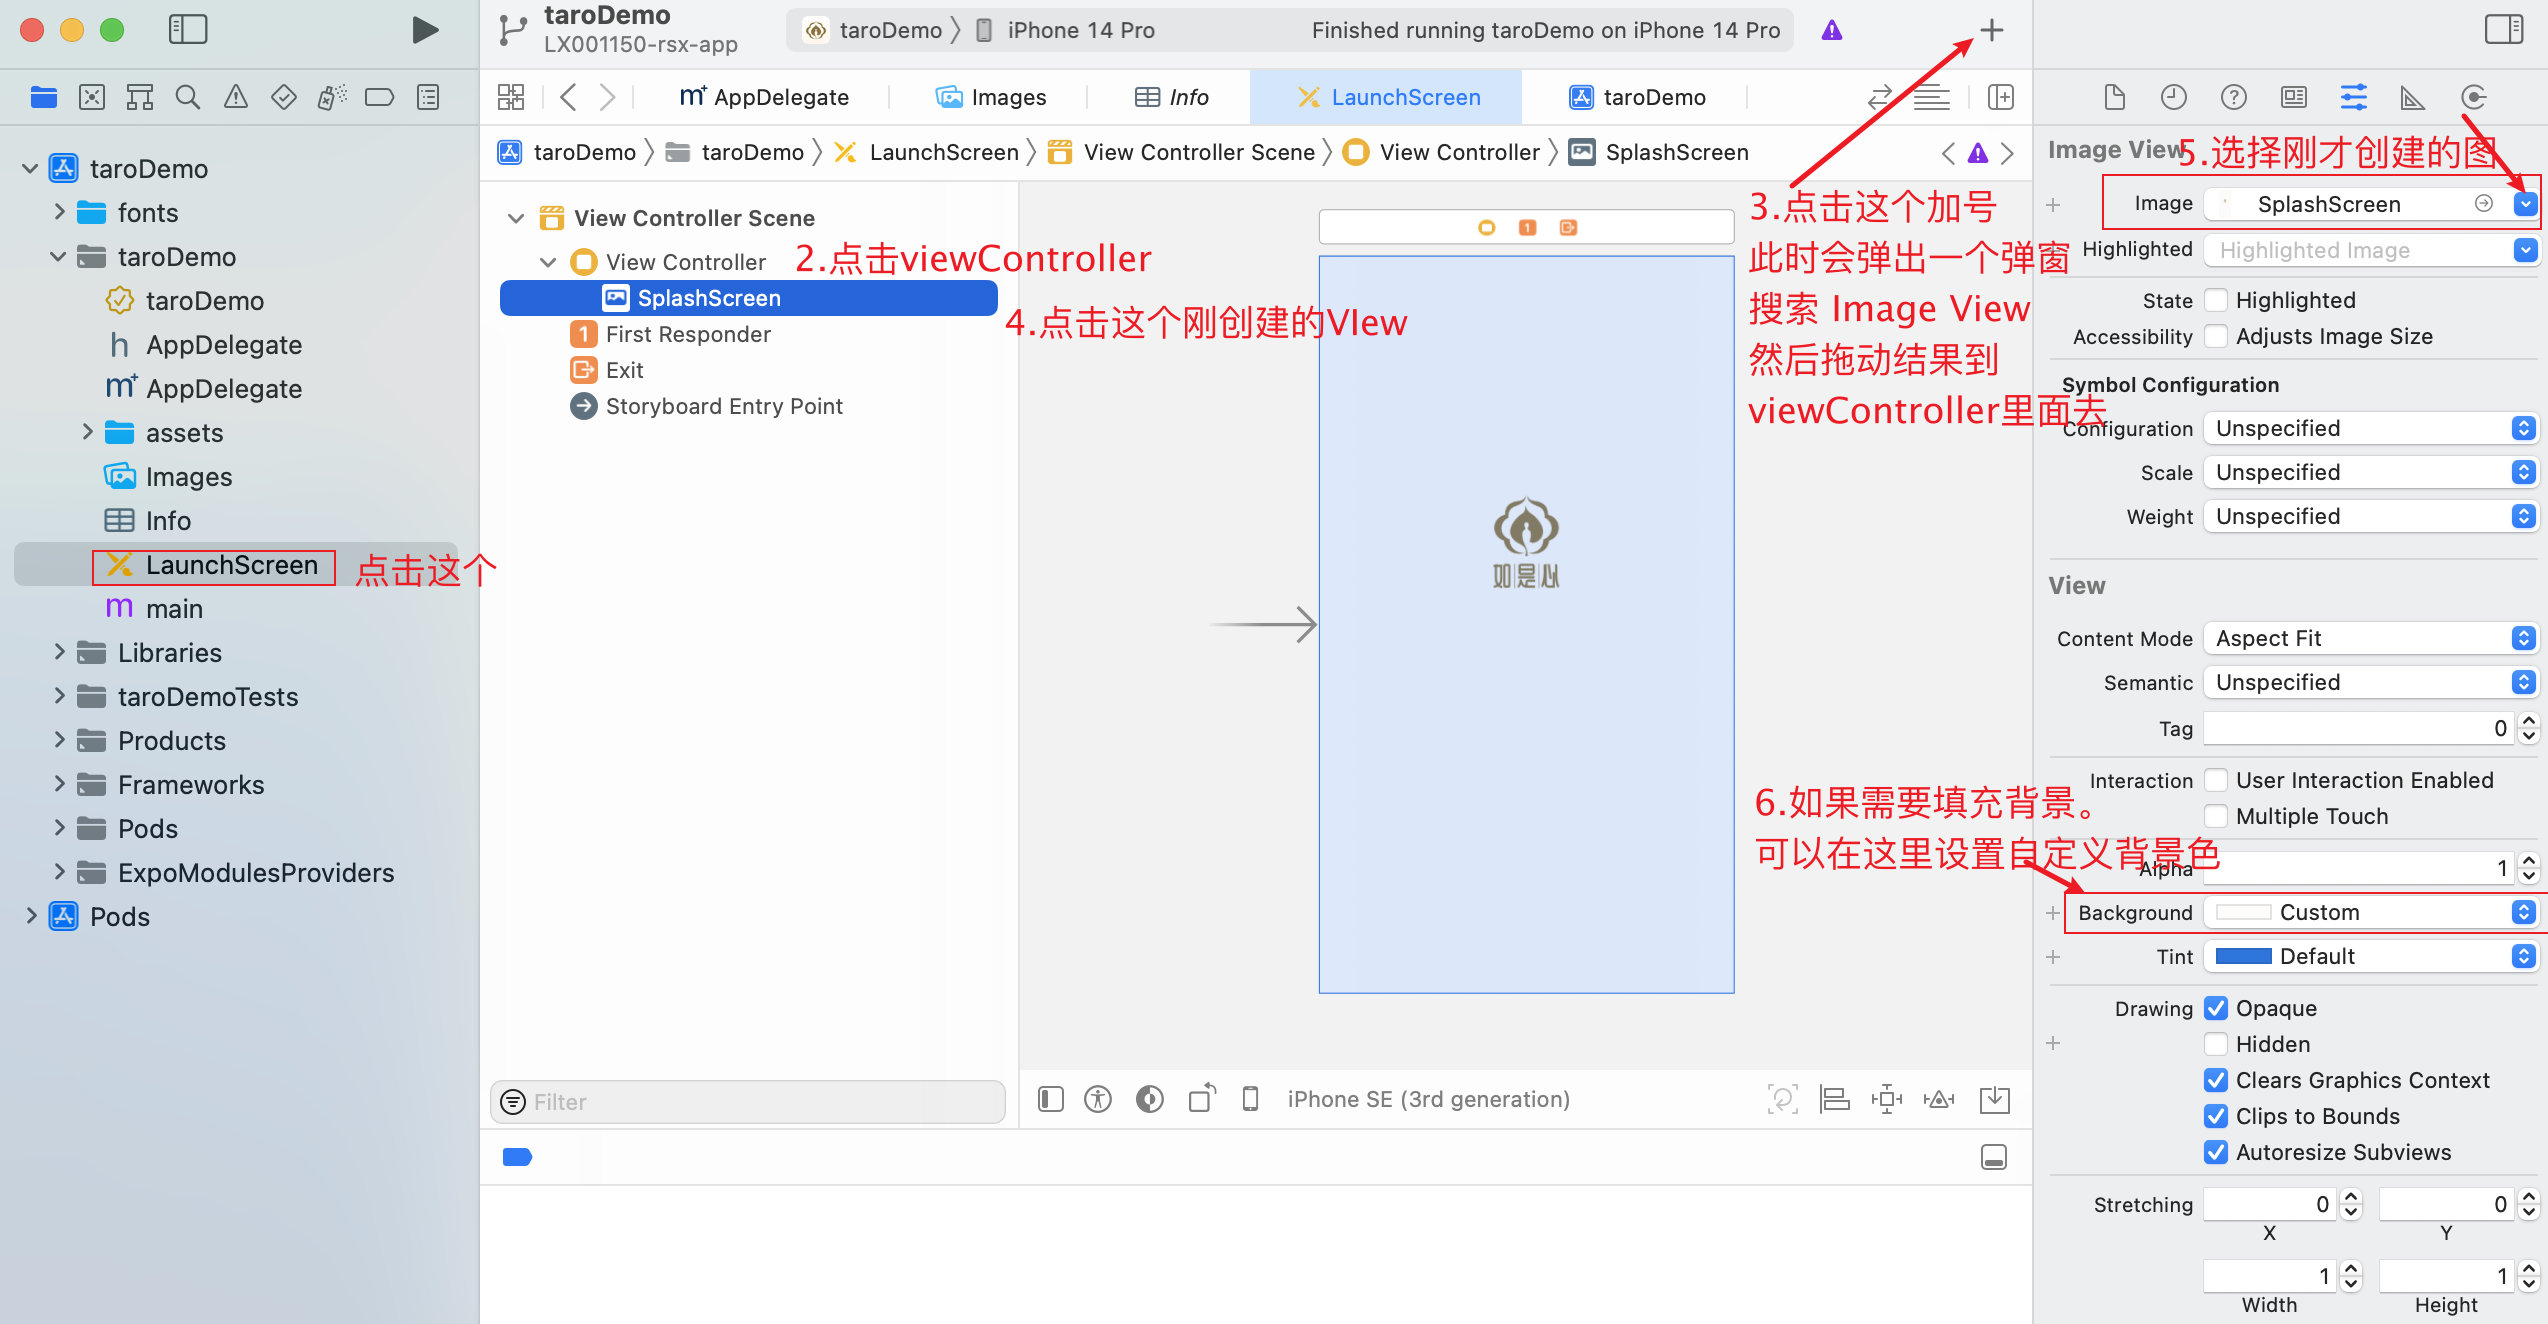
主要步骤
1.找到LaunchScreen.storyboard文件.
2.清除ViewControll中的所有内容.并新增一个ImageView
3.设置ImageView的图片为刚才创建的图片.
4.(可选)设置自定义背景色.
PS 设置完毕之后记得清空构建缓存!!!
在代码使用
代码中编写启动屏的相关代码. 在 app.rn.tsx
import React, { useCallback, useEffect, useState } from 'react';
import { Text, View } from 'react-native';
import Entypo from '@expo/vector-icons/Entypo';
import * as SplashScreen from 'expo-splash-screen';
import * as Font from 'expo-font';

// Keep the splash screen visible while we fetch resources
SplashScreen.preventAutoHideAsync();

export default function App() {
  const [appIsReady, setAppIsReady] = useState(false);

  useEffect(() => {
    async function prepare() {
      try {
        // Pre-load fonts, make any API calls you need to do here
        await Font.loadAsync(Entypo.font);
        // Artificially delay for two seconds to simulate a slow loading
        // experience. Please remove this if you copy and paste the code!
        await new Promise(resolve => setTimeout(resolve, 2000));
      } catch (e) {
        console.warn(e);
      } finally {
        await SplashScreen.hideAsync();
        // Tell the application to render
        setAppIsReady(true);
      }
    }

    prepare();
  }, []);


  if (!appIsReady) {
    return null;
  }

  return (
    <View style={{ flex: 1, alignItems: 'center', justifyContent: 'center' }}>
      <Text>SplashScreen Demo! 👋</Text>
      <Entypo name="rocket" size={30} />
    </View>
  );
}